TL;DR: mquickjs on LiteX runs Fabrice Bellard’s JavaScript engine bare-metal on a VexRiscv
softcore inside a LiteX SoC. JavaScript calls litex.* and framebuffer.* to drive real
hardware. It runs in litex_sim with no board, and on real FPGAs it does framebuffer demos and a
live browser editor served from the board itself.
JavaScript, on the FPGA, for real#
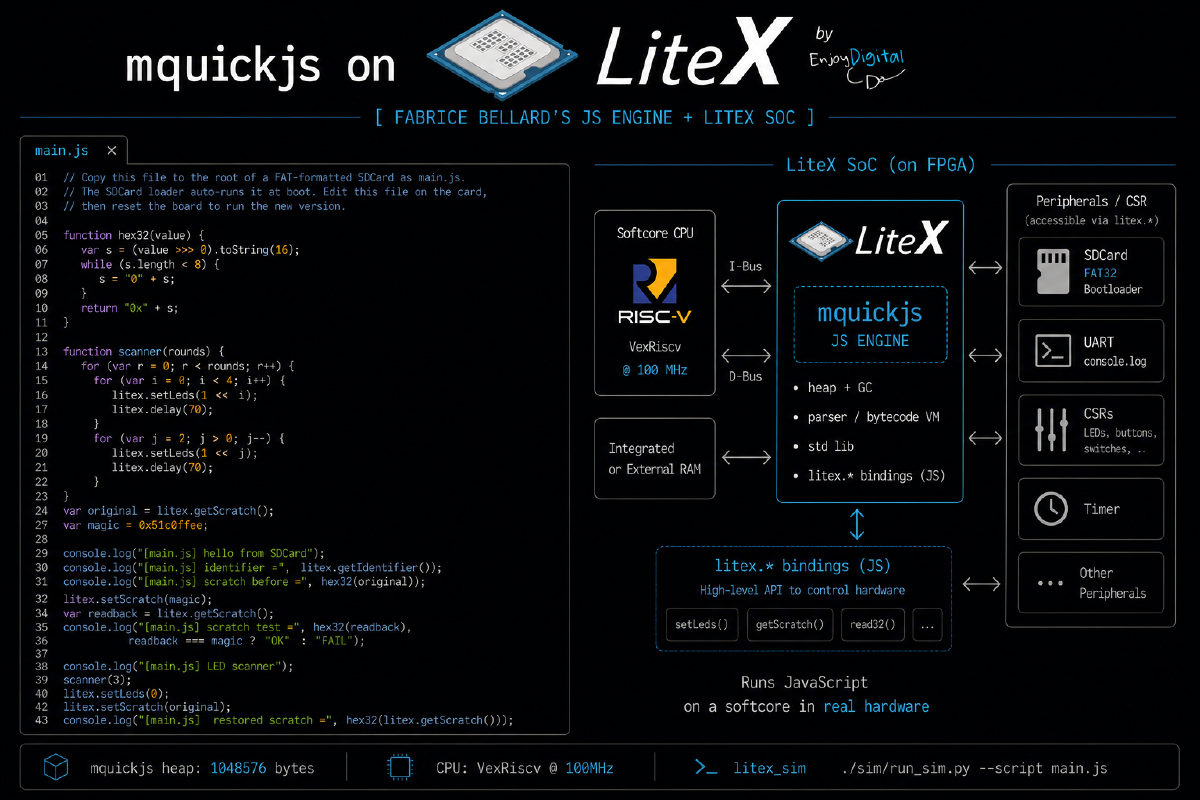
I wanted to know if I could run JavaScript on the FPGA itself. Not cross-compiled to C, not on the host, but actually interpreted by the softcore. So I took mquickjs, Fabrice Bellard’s small JavaScript engine, and dropped it into the firmware of a LiteX SoC.
Here is what actually runs: LiteX boots a VexRiscv firmware, the firmware sets up an mquickjs heap,
parses your script, and runs the VM. Your JavaScript reaches the hardware through a small litex
object. The RISC-V core on the board is the thing reading your for loop.
JavaScript file -> firmware.bin -> VexRiscv -> mquickjs -> LiteX CSRsIt runs in litex_sim, so you do not need a board to try it, and I have run it on a Digilent Arty
A7 and a LambdaConcept ECPIX-5.
How it fits together#
There is not much to it, which is sort of the point. LiteX gives you the SoC, a bit of C exposes a
few hardware bindings, and the JavaScript does the rest. The script is baked into the firmware at
build time (a small embed_script.py turns your.js into a header), the LiteX BIOS loads the
firmware into main_ram, and VexRiscv runs the VM on bare metal.
The firmware is a few small files. main.c boots, creates the context and heap, and either runs
your script or drops into a UART REPL. mqjs_port.c holds the console.log, litex.* and
framebuffer.* bindings, plus an optional SDCard load(). For the live demo there is a tiny HTTP
server on top of LiteEth and lwIP. The JavaScript heap is static, 1 MiB by default, and mquickjs
never calls malloc() for JavaScript objects, which keeps things predictable on a bare-metal
target.
If you read the git log it is basically that, in order: get mquickjs running, make it draw to a framebuffer, add the browser runtime, then bring it up on the ECPIX-5 and the SDCard. Nothing surprising in there, which is how I like a bring-up to go.
Try it in simulation#
No board needed. The first run builds the LiteX simulator; after that it only rebuilds the firmware and your script:
git clone --recursive https://github.com/enjoy-digital/mquickjs-on-litex
cd mquickjs-on-litex

./make.py sim
./make.py sim examples/demo.js
./make.py sim-video examples/plasma.js
The plain run prints what you would hope:
--========= mquickjs on LiteX =========--
running embedded script...
hello from mquickjs on LiteX!
[mqjs] done
examples/demo.js is the one I show first, because you can watch the JavaScript drive the LiteX
LEDs while it times itself over the UART:
function leds(value) { litex.setLeds(value & MASK); }
function pause(ms)   { litex.delay(ms); }

show("knight rider", function () {
    for (var round = 0; round < 4; round++) {
        for (var i = 0; i < LEDS; i++) { leds(1 << i); pause(80); }
        for (var i = LEDS - 2; i > 0; i--) { leds(1 << i); pause(80); }
    }
});
litex.setLeds() is just a CSR write, so that knight-rider loop is JavaScript, interpreted on the
softcore, toggling real LED pins through the LiteX bus. 🙂
The JavaScript API#
I kept the API small on purpose. litex.* is generic board and CSR access, and optional
peripherals return harmless values when they are missing, so a script written for one board tends
to run on another:
litex.getIdentifier()      // SoC identifier string
litex.clockFrequency()     // system clock in Hz
litex.millis()             // monotonic milliseconds
litex.setLeds(mask)        // no-op when LEDs are absent
litex.csrRead32(addr)      // raw CSR/bus access
litex.csrWrite32(addr, value)
On a board with a video framebuffer you also get framebuffer.*, with the usual primitives for
demoscene-style effects: clear, fillRect, line, circle, text, fade, and a blit family
for software-rendered buffers. Colours are plain 0xRRGGBB. For animation, the live runtime looks
for a setup() / frame(t) pair, where t comes from litex.millis():
function frame(t) {
    if (framebuffer.doubleBuffered) framebuffer.begin();
    framebuffer.clear(0x020406);
    framebuffer.text(24, 24, "mquickjs on LiteX", 0x12bdf2, 2);
    if (framebuffer.doubleBuffered) framebuffer.present();
}
Demos on real hardware#
On a board with video, this is the fun part. A single firmware cycles through a plasma, fire and tunnel playlist, all drawn from JavaScript into the LiteX framebuffer:
./make.py board-build --target litex_boards.targets.lambdaconcept_ecpix5 \
    --build-dir build/ecpix5-video -- --with-video-framebuffer --uart-baudrate=1000000
./make.py firmware examples/showcase.js --build-dir build/ecpix5-video
./make.py board-load --target litex_boards.targets.lambdaconcept_ecpix5 --build-dir build/ecpix5-video
The standalone version is even less fuss. With --with-sdcard the LiteX BIOS loads boot.bin and
mquickjs loads main.js off the card. Edit main.js on the SDCard, reset the board, and it runs
the new script. No toolchain in the loop.
A live editor served by the FPGA#
My favourite bit: with Ethernet and a framebuffer enabled, the board serves its own editor. The
firmware runs a small HTTP server, so you point a browser at http://192.168.1.50/, type some
JavaScript, hit Run, and it gets sent back to the board and run by mquickjs on the LiteX CPU. The
editor page itself is served by the FPGA.

The HTTP side is small and easy to read: GET / for the editor page, POST /run to reset the
context and run a fresh script, POST /eval for a snippet in the live context, POST /control to
stop, pause or resume, and GET /load / POST /save for main.js on the SDCard. If setup()
throws, the board keeps the previous script and rejects the new one, which saves you when you are
live-coding a demo and fat-finger something.
Why I like it#
It is a toy, and that is fine. But it is also a decent advert for LiteX. Adding a CPU, a framebuffer, an Ethernet MAC and an SDCard to the SoC is a handful of flags on a board target, and every one of them is reachable from software in an obvious way. That is why a thing like this finishes in a weekend instead of turning into a project. And it is a much better way to show someone a softcore than blinking an LED: hand them the keyboard and let them type something the chip draws. 🙂
Try it#
Simulation needs no hardware:
git clone --recursive https://github.com/enjoy-digital/mquickjs-on-litex
cd mquickjs-on-litex
./make.py sim-video examples/plasma.js
The code, the examples and the full docs (architecture, JS API, hardware bring-up, the demoscene notes) are at github.com/enjoy-digital/mquickjs-on-litex.
Built on LiteX and Fabrice Bellard’s mquickjs.
Work and ideas by Enjoy-Digital; written up with AI in the loop.